
· 5 min read

Hello and happy new year! It's our great pleasure to announce that we have released oclif v2, which uses the new @oclif/core library! 🎉

oclif v2 includes many changes that improve the experience of both creating and using an oclif CLI.

Going forward, we don't plan to make any updates to oclif v1 and its corresponding libraries, except for critical security fixes. See the compatibility matrix for a list of these libraries. In order to give developers time to migrate from v1 to v2, we're not completely dropping support yet. But at some point in the future we'll archive the v1 repositories and deprecate their versions on npm.

What’s changing?​

Repository Changes​

All repositories under the oclif org now use main as their primary branch and oclif-v1 as the legacy branch. The main branch corresponds to oclif v2 and the oclif-v1 branch to oclif v1. If you find any repos that don’t have a main branch, you can safely assume that they're not used in oclif v2 and will be deprecated in the future.

Consolidating Tools & Libraries​

The oclif-dev CLI has now been incorporated into oclif. You now no longer need to install a separate package to manage your entire CLI’s lifecycle.

The following libraries have been consolidated under @oclif/core and will be deprecated at some point in the future. Read the migration guide to learn how to update your CLI or plugin to use the new core library.

  • @oclif/command
  • @oclif/config
  • @oclif/error
  • @oclif/help
  • @oclif/parser

No more single vs multi command CLIs​

There's only one "type" of oclif v2 CLI, but it can have as few or as many commands as a developer wants. As a result, there’s only one command to generate CLIs, oclif generate, as opposed to the old oclif single and oclif multi commands.

Node > 12​

To ensure oclif CLIs are as secure as possible, all v2 libraries and plugins support only Node 12 or higher as of now. Going forward, they'll support only Node Maintenance or higher, as defined by Node's release schedule here: https://nodejs.org/en/about/releases/.

What’s new?​

New example CLI​

oclif-hello-world is our new example repo. This is also the repo that's used as a template when running oclif generate to create a new CLI. This repo will always be able to be referenced as an example of what an oclif v2 CLI should look like.

Spaced commands​

oclif CLIs can now use spaces, instead of colons, to separate topics and subcommands. To enable this feature, simply add “topicSeparator": " " to the oclif config in your package.json. See an example in our example repo.

// Old commands that use :
$ mycli do:something
// New spaced commands
$ mycli do something

Note: Spaced commands are backwards compatible. So if you enable spaced commands for your CLI, users will still be able to use : as a separator. This ensures that any existing scripts don't break.

New Help Output​

We’ve revamped the way command help is outputted to the terminal, making it both easier to implement and easier to read. See the difference between the old help output on the left and the new help output on the right in the screenshots below.

oclif v1oclif v2

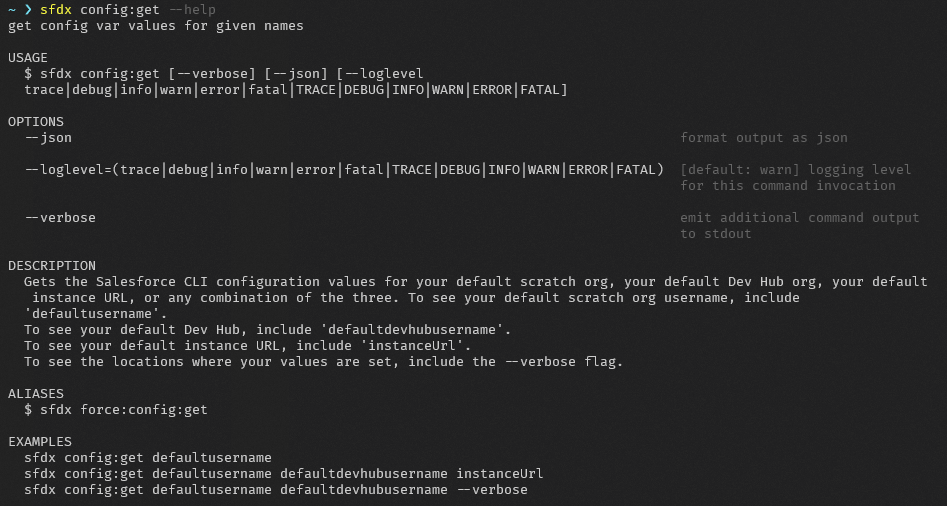
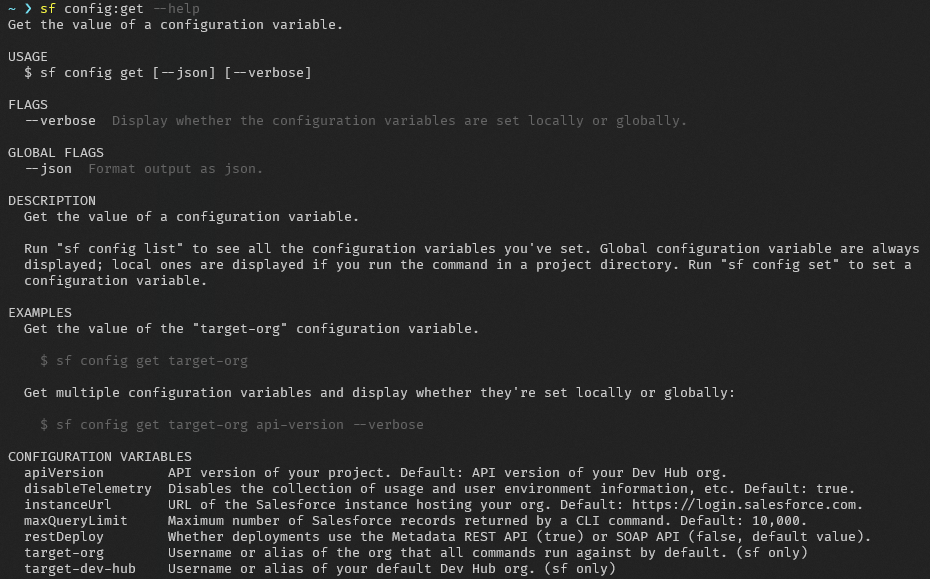
Notice that there are new sections for flags and global flags, examples are displayed with better spacing, and there is a section at the bottom called Configuration Variables. This Configuration Variables section is not part of the new help by default. But we've added support for custom help sections, which is what the sf CLI uses to create the new section.

Async Command Parsing​

We’ve also improved the performance of new CLIs by rewriting how commands are parsed on initialization. The new parser is asynchronous, which makes CLIs with a lot of commands or installed plugins much faster.

What’s coming next?​

Part of our charter for the release of oclif v2 includes improving our engagement with the oclif community. We know that over the past couple of years we’ve reduced our involvement, and a lot of issues and PRs have languished in limbo. Hopefully you’ve already seen increased activity and responses from oclif maintainers recently, but if you haven’t, please don’t hesitate to ping us by tagging @admins in oclif repos.

We also want to start interviewing members of the oclif community to acquire feedback and prioritize the features and fixes you deem most important!

Best,

The oclif team


Reference material​

Migration Guide​

This guide explains how to upgrade a CLI or plugin from the old oclif v1 libraries to the new @oclif/core library that oclif v2 uses.

https://github.com/oclif/core/blob/main/MIGRATION.md

Compatibility Matrix​

The following matrix shows how the v1 libraries and plugins relate to the new v2 ones. Use this matrix as a guide to know what to drop and which versions to switch when upgrading your plugins and CLIs to v2.

oclif "v1"oclif "v2"
Utility CLIsoclif@<2
@oclif/dev-cli@<2
oclif@>=2
Main packages@oclif/command
@oclif/config
@oclif/errors
@oclif/parser
@oclif/plugin-help
@oclif/core@>=1
Node LTSNode v8-14Node v12+ (at time of writing)
TypeScripttypescript@<4typescript@>=4
Main plugins@oclif/plugin-autocomplete@<1
@oclif/plugin-commands@<2
@oclif/plugin-help@<4
@oclif/plugin-not-found@<2
@oclif/plugin-plugins@<2
@oclif/plugin-update@<2
plugin-warn-if-update-available@<2
plugin-which@<2
@oclif/plugin-autocomplete@>=1
@oclif/plugin-commands@>=2
@oclif/plugin-help@>=4
@oclif/plugin-not-found@>=2
@oclif/plugin-plugins@>=2
@oclif/plugin-update@>=2
@oclif/plugin-warn-if-update-available@>=2
@oclif/plugin-which@>=2

· 3 min read

Greetings!

We hope this blog post finds you well.

Introducing...​

We are excited to announce the next iteration of the oclif project today: @oclif/core.

We have learned a lot in the last three years of developing oclif, developing on oclif and supporting millions of command runs a day via Heroku and Salesforce CLIs. @oclif/core ("Core") simplifies the oclif development experience and introduces highly requested new features.

Core combines the essential oclif packages into one "core" package, aptly named @oclif/core.

Core also introduces:

  • A default command option
  • Colon or space command syntax
  • Async command parsing
  • Command piping to arguments

With the introduction of default command functionality, Core simplifies the oclif project and removes the notion of single or multi command CLIs. Core CLIs can have 1 or many commands.

Along with Core, we moved the oclif-dev CLI into the oclif CLI creating a single "utility" CLI. This CLI also introduces a new AWS S3 compatible publishing scheme.

What to expect in the near future​

Core is in pre-release beta and being actively developed for new internal Salesforce CLIs.

Much documentation needs to be written in the coming months including migration paths. Migration onto Core should be as painless as possible with many exports remaining entirely unchanged. Look for forthcoming blog posts and documentation on oclif.io.

Early this summer, tentively June 1, we will release Core v1. Core's release will coincide with major bumps to many other oclif plugin packages. See the compatibility matrix below.

At Core's v1 release, the current "main" oclif packages (namely: command, config, errors & parser) will go into maintenance mode until Jan 2022. They will receive only bug and security fixes and they remain compatible with current versions of the oclif and oclif-dev CLIs. Afterwhich, they will be archived.

Companioning Core, the next major release of the oclif CLI (literally oclif@2) will generate Core CLIs.

Going forward​

We are excited to release Core! We invite you to poke around the Core repo. It may appear to be a big change but Core keeps what you already enjoy about oclif while reducing development complexity, project dependencies, package coupling and bundle size and introduces many requested features previously too prickly to weave into the current oclif architecture.

Best,

The oclif team

Reference: Compatibility matrix​

oclif "v1"oclif "Core"
Utility CLIsoclif@<2
@oclif/dev-cli@<2
oclif@>=2
Main packages@oclif/core@<2
@oclif/config@<2
@oclif/errors@<2
@oclif/parser@<4
@oclif/plugin-help@<4
@oclif/core@>=1
Node LTSNode v8-14Node v12+
TypeScripttypescript@<4typescript@>=4
Main plugins@oclif/plugin-autocomplete@<1
@oclif/plugin-commands@<2
@oclif/plugin-help@<4
@oclif/plugin-not-found@<2
@oclif/plugin-plugins@<2
@oclif/plugin-update@<2
plugin-warn-if-update-available@<2
plugin-which@<2
@oclif/plugin-autocomplete@>=2
@oclif/plugin-commands@>=2
@oclif/plugin-help@>=4
@oclif/plugin-not-found@>=2
@oclif/plugin-plugins@>=2
@oclif/plugin-update@>=2
@oclif/plugin-warn-if-update-available@>=2
@oclif/plugin-which@>=2

· 2 min read

Hello oclif developers! We hope you are all doing well.

Earlier this year, we started our planning for oclifconf v2 and, like all conference, had to change course. We opted not to hold a virtual conference, however, we wanted to take some time to highlight a few oclif features shipped this year.

Feature: Help templating​

One of the most requested features, help templating enables oclif developers to customize the help output for their CLI.

Read the announcement.

Feature: Custom error delegation​

This feature both improved how oclif throws and handles errors and allows oclif developers to overwrite or interject in oclif’s error handling.

Read the announcement.

Feature: postrun hooks​

We have added a new lifecycle event postrun. Your CLI can now run a hook after a command has ran.

See our hook documentation.

Feature: Root index command​

Previously, oclif would display CLI help if only the binary name with no command ID was invoked, oclif now supports a "root index" command. If present, a command defined at src/commands/index.ts will be run if no command ID is found.

1 million weekly downloads​

While exact oclif usage metrics are hard to pin down, we use npm download statistics of oclif packages as a rough approximation. Earlier this year, oclif's command package hit 1 million weekly downloads for the first time!

This year has been presented its challenges on everyone. We want to thank you, oclif developers, whom have taken the time to use and improve the oclif project. We look forward to seeing you all - in person - in the future!

All our best,

The oclif team

· One min read

Often CLIs are used as handy tools and when things go wrong it’s useful to have additional context. In oclif we have added a couple of additional properties that can show extra context to the users when an error is displayed. The code, ref and suggestions will now be displayed if they are included. This will work with an existing oclif CLI by adding the latest @oclif/errors and @oclif/core to the CLI's package.json dependencies.

For example, using this.error with the additional properties:

class TestError extends Command {
async run() {
this.error("An error has occurred!", {
code: "OCLIF_ERR",
ref: "https://oclif.io/docs/commands#thiserrormessage-string--error-options-code-string-exit-number",
suggestions: ["Use these extra properties to provide additional context"],
})
}
}

would result with the following output:

›   Error: An error has occurred!
› Code: OCLIF_ERR
› Try this: Use these extra properties to provide additional context
› Reference: https://oclif.io/docs/commands#thiserrormessage-string--error-options-code-string-exit-number

If these properties are not provided then nothing changes and the CLI will continue to display the single error message output as it did before. Additionally, as part of this exercise we’ve added documentation around Error Handling in oclif which should come in handy if the need arises to extend oclif’s default handling of errors.

· 2 min read

Out of the box oclif provides a great help experience for CLIs.

But what if, as an oclif developer, you want to customize some or all of the output?

You can now customize your CLI's help output by implementing the HelpBase abstract class.

Getting started with custom help​

If you have not done so yet, update @oclif/core.

$ yarn add --latest @oclif/core

To get started, first define the filepath to your help class in oclif's config in package.json. This is a relative path to the help class, without a file extension.

For this example, the help class will be created in a file at "[project root]/src/help.ts".

{
// ...
"oclif": {
"helpClass": "./lib/help"
// ...
}
// ...
}

From here there are two paths, implement the HelpBase abstract class yourself or overwrite the parts of the default Help class you want to customize (ex: how command usage is displayed). We recommend the latter approach but cover both in the new Help Classes docs.

Separating TOPICS & COMMANDS in the new default Help class​

Previously, topics and child commands were listed in help output under a single list heading called "COMMANDS". But we found this can be slightly confusing. Some topics are commands also (a.k.a. topic-commands) while others are simply organizational namespacing (and when ran just show their help).

The new default Help class splits the list of children into distinct lists of "TOPICS" and "COMMANDS", with the possibility of an item appearing in both if it a topic-command. This makes it clearer what is expected to be ran - "COMMANDS" - and what is providing structure - "TOPICS" - when looking at the help output.

VERSION
plugin-help-example/0.0.0 darwin-x64 node-v12.12.0

USAGE
$ plugin-help-example [COMMAND]

TOPICS
topic this is a topic and has child topics or commands

COMMANDS
hello describe the command here
help display help for plugin-help-example

We look forward to seeing what custom help features you implement in your oclif CLIs with this new feature!

· 3 min read

Back in February of this year, plans were announced to deprecate TSLint in favor of ESLint. TSLint's goal has become to work toward a “unified developer experience” by supporting ESLint development going forward.

What has changed in oclif​

To keep inline with the community, oclif has transitioned to ESLint for all our core libraries as well as all our official plugins.

Starting in v1.15.x, oclif will now optionally generate projects with ESLint for both TypeScript and JavaScript CLI’s.

ESLint does require Node to be on stable LTS version, at the time of writing, Node 8.10.x, Node 10.13.x & Node 12.x.x.

How does this affect you​

Existing CLI’s are unchanged, but any newly generated CLI's will only give the option of using ESLint. If you are running tslint in your CLI, we recommend you switch to ESLint as well.

In migrating our projects we took the following steps (for an example of these changes see this pull request).

  1. Install eslint

    $ yarn add eslint eslint-config-oclif eslint-config-oclif-typescript --dev

  2. Add eslint related files

$ echo '{
"extends": [
"oclif",
"oclif-typescript"
],
"rules": {
}
}' > .eslintrc
  1. Remove tslint and related packages

    $ yarn remove @oclif/tslint tslint

  2. Remove tslint related configuration files

    $ rm tslint.json

  3. Change lint script in our package.json from something like:

    "lint": "tsc -p test --noEmit && tslint -p test -t stylish"

    to

    "lint": "eslint . --ext .ts --config .eslintrc"

To preserve the test compile (tsc -p test --noEmit) we also made the following updates to our scripts:

"pretest": "tsc -p test --noEmit"

In some cases we had our posttest duplicating the same steps as our lint script so it’s cleaner to have it reference the lint job directly with:

"posttest": "yarn lint"

  1. Run yarn lint --fix. This attempts to auto-fix any linting violations automatically. In the case an auto-fix isn’t available it should be fixed manually or ignored (see the eslint configuration doc for more information)
  2. Do a search in the codebase for tslint and remove any unnecessary tslint disabling comments, like:
/* tslint:disable:object-literal-sort-keys */

If you are on a version of Node that is not supported by ESLint, you will also need to update your Node engine. ESLint supports Node 8, 10, and 12 so you should upgrade to the most recent Node version compatible with your CLI and also supported by ESLint (see ESLint's Installation and Usage instructions).

When will this take effect​

These changes have taken effect in oclif v1.15.1. When you generate a new CLI or plugin it will now contain configuration for ESLint instead of TSLint.

· 3 min read

To maintain a healthy project trajectory, oclif follows and supports Node Active LTS release, currently Node 10 & Node 12. This means ensuring that oclif continues to play nice with coming Active LTS Node versions and other packages in the ecosystem. Moving forward also means leaving older versions behind. Starting in 2020, Node will stop maintaining Node 8 and it is our intent at that time to also follow suit. Let’s take a look at a few ways we will be supporting these changes.

CI Environments​

CLIs created with the oclif cli going forward will be generated with a CircleCI configuration with Node 10 & 12 and an Appveyor configuration using Node 10. We have also added Node latest to CircleCi to be an early warning detection against coming Node changes (Node latest is managed by CircleCI).

We have already updated every oclif repo's CI configs to reflect this.

If your existing CLI uses either Appveyor or CircleCI you can update your config files also, like so:

.circleci/config.yml​

Your CircleCI config should contain a node-latest job, aliased as test. From this, there should be two extensions of this job for the Active LTS Node versions, Node 10 and Node 12.

  node-10:
<<: *node-latest
docker:
- image: node:10
node-12:
<<: *node-latest
docker:
- image: node:12

Notice that these declarations only change the Docker Node images used to run that job.

Additionally, the jobs listed within workflows must also be updated to reflect our changes in configuration:

    jobs:
- node-latest
- node-10
- node-12

appveyor.yml​

For appveyor we are currently only testing the oldest Active LTS Node version, Node 10. Update the nodejs_version proppert in your appveyor.yml file to reflect this.

environment:
nodejs_version: "10"

Deprecating Node 8 & Updating packge.json engines​

In Jan 2020, Node will end its Node 8 maintenance. We will follow suit by setting the package.json engine property in oclif packages to >=10 and bumping the package's major versions.

Depending on how you ship your CLI you may wish to also bump the engines version in your CLI's package.json. You can read more about the implications of the engines property configuration in the npm documentation.

Also consider distributing your CLI with its own Node version.

Packaged Node Version​

When using dev-cli to pack your CLI it will use the Node version as specified in your package.json under the oclif.update.node.version property. This value should reflect an Active LTS Node version (dev-cli does not currently enforce versions).

Supporting the future​

As a community we may discover bumps along the way as we upgrade. If you notice something related to oclif please feel free to open an issue or submit a pull request under the relevant oclif package within the org.

We look forward to using the latest from Node and the community and keeping oclif healthy along the way.

· 4 min read

In May, Heroku and Salesforce Open Source organized oclifconf, a conference for developers & product managers building CLI tools on top of the open source oclif framework. The speakers came from various tech companies, such as Adobe, Netlify, and Apollo, who have already built amazing CLI experiences. The topics covered everything from the incredible capabilities oclif has unlocked, to the community-built plugins extending its functionality, and even what the behavior of an adaptive CLI tool might look like.

Below is a listing of all of the talks from the event, along with a short summary. Enjoy!

The future of oclif by Jeff Dickey​

In its relatively short lifetime, oclif has already inspired many developers and companies to adopt its framework as a means for implementing their own command-line tooling. In this talk, Jeff Dickey, an oclif founding team member, recaps the project's history and inspiration. He also looks towards the future and outlines some features and improvements that the tool could adapt. This isn't so much a definitive roadmap of where oclif is headed, but rather, a call to inspiration for developers eager to contribute! And if you are interested in contributing, check out the open issues in the oclif GitHub repo and come say "Hello!" on Spectrum Chat.

Open Source Citizenship by Josh Simmons​

When it comes to open source, it's more than just individuals now. More and more frequently, large corporations are contributing to projects by donating to contributors, sponsoring events, or upstreaming contributions. But keeping open source projects and communities healthy requires more than just money and brainpower. Josh Simmons surveyed multiple open source communities and relays his findings as to what help maintainers and contributors actually need in this talk.

Building an enterprise-grade CLI with oclif by Thomas Dvornik​

Security and performance are all about trust. While oclif is an extremely extensible framework for building CLI tooling, there are additional requirements to fulfill for enterprise businesses to adopt it that might not be necessary for individual developers. Thomas Dvornik outlines what he and his colleagues at Salesforce have implemented as plugins to oclif to satisfy these needs, including encrypted OAuth, plugin signing, lazy loading dependencies, synchronizing weekly releases and deprecations across dozens of repositories, and establishing cross-team coding and documentation standards.

How Adobe I/O built an extensible CLI with oclif by Jesse MacFadyen​

Perhaps oclif's most appealing feature is its support for plugins. In Cordova's case, they've created a sophisticated telemetry system that helps Adobe developers see which commands users are using--and reports on which ones are erroring out. By embedding a feedback system into the tool, users are even able to quickly send their suggestions to a form, without ever leaving the terminal. Jesse MacFadyen demonstrates how oclif's plugin system can work beyond simply executing commands.

Integrating oclif with GraphQL and Apollo by Evans Hauser​

For Evans Hauser and the team at Apollo, oclif is best thought of as "React for the CLI." As a client paired with a strongly-typed API contract to a server, it can deliver structured and consistent commands to retrieve external data. What better mechanism to use for this transfer than GraphQL, a framework which empowers the client to ask precisely for the data it needs, and nothing more?

Adaptive Intent-based CLI State Machines by Shawn Wang​

In designing oclif, Jeff Dickey wrote out 12 CLI factors to keep in mind. In this talk, Shawn Wang outlines a 13th: state. State is hard, because it depends on context, and context depends on understanding what a user intends to do, not what they are asking. Shawn is working towards enabling oclif to better understand the commands a user has entered, so that it can predict and interpret future commands that might be entered next. This would enable CLI tools to not just interpret a users' commands, but to also interpret their intent.

· 5 min read

oclif makes it easy to create a command line interface (CLI) in node. Most commands have parameters — also known as "flags", "args", and sometimes "options". This blog post explains what these parameters are and when to use them. We also have a new feature that makes it easier for users to detect typos when using parameters.

Note the following describes GNU-style flags. Not all CLIs follow this convention, but it is the most commonly used.

Parts of Speech​

Any command line interface command has a few standard "parts of speech". As a user of CLI tools, knowing these parts of speech can help you make fewer typos. It can also help you understand complex commands other people share with you more quickly. If you are designing a CLI tool it is even more important to understand these parts of speech, so you can come up with the most ergonomic interface for your users.

Of the many ways you can pass data to a CLI command, three of them are parameters that are always to the "right" of the command. The three types of parameters are argument, short flag, and long flag.

Example ls​

One of the most common and simplest unix commands is ls which "lists" the contents of a directory.

command​

ls

This command ls works on its own, as a standalone command. Without any parameters this command will list the contents of the current folder, using an implied . directory.

argument​

ls .
ls ~/code/some-repo-name

If you pass a command argument to this command, like the directory name . (current folder) or ~/code/some-repo-name, it will list the contents of that directory instead.

An argument is anything to the right of a command that is not a flag. An argument can come before or after flags.

Long flag​

To list additional files that are normally hidden (like ~/.bashrc), you can use a flag on the ls command. ls --all is the long flag form. A long flag always uses a double dash, and it is always represented by multiple characters.

ls --all
ls . --all

Short flag​

There is also a short flag form of this flag: ls -a. The a is short for all in this case. A short flag always uses a single dash, and it is always represented by a single letter.

ls -a
ls . -a

Short flags can stack too, so you don't need a separate dash for each one. Order does not matter for these, unless passing a flag argument.

ls -la

Flag arguments​

Many flags accept an option, which is a "flag argument" (as opposed to a "command argument"). In general a command's parameters can be in any order, but flags that accept options must have the option directly after the flag.

For an example, here the -x flag does not accept an option but the -f flag does. archive.tar is the option being passed to -f.

tar -x -f archive.tar
tar -xf archive.tar

A flag and its option can be separated by a space or an equals sign =. Interestingly, short flags (but not long flags) can even skip the space, although many people find it much easier to read with the space or equals sign.

These three are all valid and equivalent:

tar -f archive.tar
tar -f=archive.tar
tar -farchive.tar

Long flags must have a space or equals sign to separate the flag from its option.

git log --pretty=oneline
git log --pretty oneline

Other Ways of Passing Data​

We've covered parameters, which are arguments, short flags and long flags. There are two other ways to pass data to a command: environment variables ("env vars"), or standard input ("stdin"). These won't be covered in this blog post.

Designing a Command​

Scenario: we want to design an oclif command that echos an input like "Casey", and returns "hi, Casey!". There are many ways the user could pass this in, and here we show an example of each type of input.

argument​

greet-me Casey

short flag with argument​

greet-me -n Casey
greet-me -n=Casey
greet-me -nCasey

long flag with argument​

greet-me --name=Casey
greet-me --name Casey

environment variable​

NAME=Casey greet-me

standard input​

echo "Casey" | greet-me

Command ergonomics​

Short flag vs long flag​

Many CLI commands allow for both long flag and short flag forms. In the Heroku CLI every flag has at least a long flag form and roughly half of the flags also have a short flag form.

The long flag form is easier to read, but takes more characters to type. It is often most useful when you want someone to understand a particular command statement quickly and easily, such as in a README.

The short flag form is quicker to type, and is often better for frequently used commands. Short flags are especially useful when stacking short flags together.

· One min read

Introducing oclif

Coding for the browser takes serious time. You need to deal with front-end JS, CSS, design, product, and a ton more. On the other hand, building for a CLI takes a fraction of the effort. This makes CLIs particularly great for prototyping out new functionality, offering admin/internal tools, or power-user functionality.

Read More